14 easy food play ideas for babies, toddlers and children

Guest blog by Lindsey Eivan- Early Years Lead @love_teach_play
There is so much learning that can happen when children are given opportunities to explore and play with food. When I say ‘food’ I am covering both edible and dried food options too. It’s so important to give children the time and space to explore the sensory properties of different foods and become more comfortable with how it will eventually feel in their mouths. It gives them a context to play with food outside the regular meal times, which I have personally found, eases the pressure and gives my daughter the responsibility to decide whether she wants to have a taste or not.
Food play and exploration is a recommended strategy for children who are fussy eaters or who present with sensory feeding disorders. If you are looking or further support to help your fussy eater then you can purchase Stacey’s online fussy eating course.
Food play opens up the opportunity to practice a range of skills:
Provides multi-sensory experiences (touch, smell, taste)
Helps to connect ideas and experiences
Promotes communication and language
Learning about the world around them, exploring textures, shapes, colours, patterns and temperatures.
Fine and gross motor skills from squishing, squeezing, using utensils, scooping, filling, pouring and manipulating different objects.
Promotes independence, resilience, motivation
Encourages curiosity and imagination
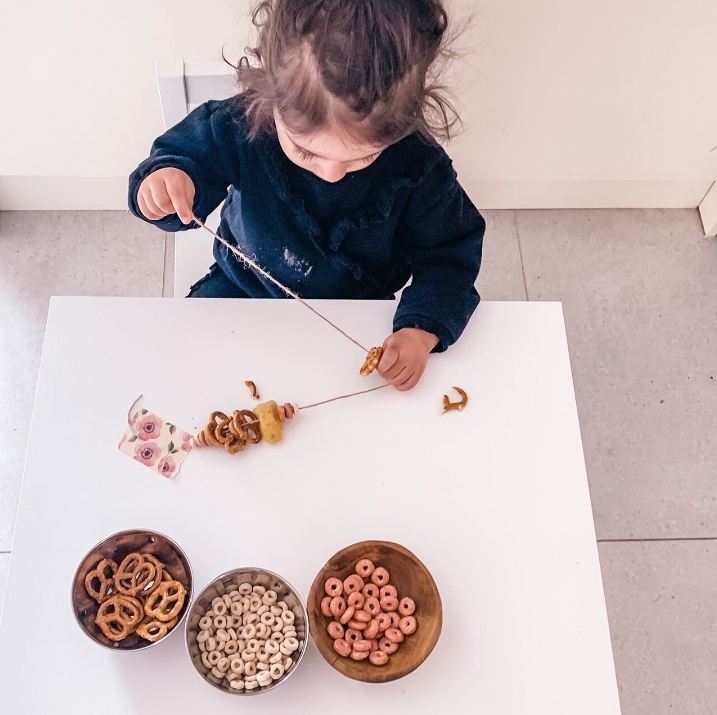
Snack necklaces
What you need:
Snacks with holes in; pretzels, hula hoops, cereals, monster munch, dried apple rings
String. Tape and a Table.
Tape the string to the table (or you can have it free, depending on child’s ability/age), give child the snack in bowl, you might need to model this one first to show them what to do. Let them enjoy snacking and creating at the same time. This is a nice easy one and great if your little one doesn’t like wet textures. This one is also excellent for exercising those finger, hand, wrist and shoulder muscles, it supports problem solving and works on building resilience, motivation, confidence and independence too!

2. Chia Slime
What you need:
1/2 cup of chia seeds
2 cups of milk/water
Food colouring
Utensils to explore with
Dish
Splash mat/wipeable surface/garden
Prepare the pudding the night before by mixing the chia seeds, milk and food colouring together. Leave overnight. Give to baby/toddler with different utensils to explore. This activity is really great right from six months old! Chia pudding is super healthy and super yummy and the texture provides an amazing sensory experience for them. After we played, I put some back in the fridge and we had it with some peanut butter and banana for dessert that day!
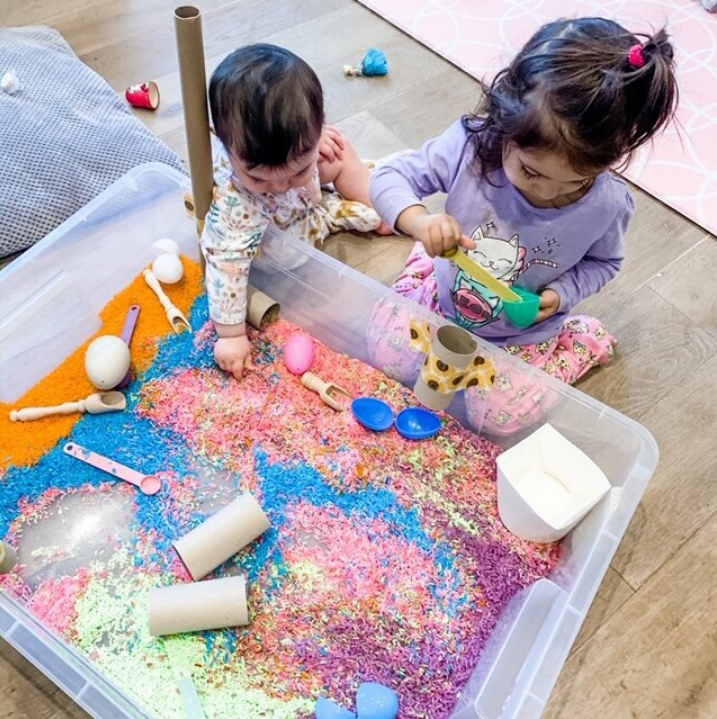
3. Rice shoots, scooping and pouring.
Rice
Big tub/container
Cardboard tubes
Food colouring
White vinegar
Sandwich bag
Scoops/spoons
Funnels
Containers
To dye the rice, pour the amount you’d like into a sandwich bag. Mix a splash of white vinegar with some food colouring (gel food colouring is best) and add it to the sandwich bag. Seal the bag and shake shake shake until all the rice is covered. Lay out on a dish/baking paper to dry. It takes a few hours to dry.
Here I have teamed up the rainbow rice with some cardboard tubes, scoops, measuring spoons and containers for the children to fill and pour the rice. The rice may go everywhere so prepare for the hoovering afterwards! Rainbow rice literally keeps forever so make sure to keep it in a jar or a sandwich bag for an easy activity another day.

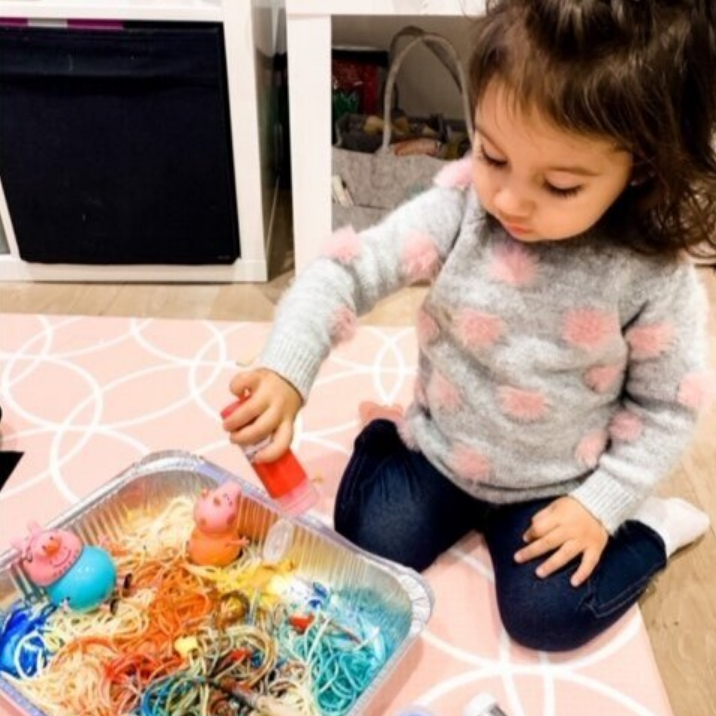
4. Spaghetti Cutting.
Spaghetti
Food colouring
Saucepan
Boiling water
Child-safe scissors/child safe knife (Doddl or Kuhn Rikon) – Optional
Cook the spaghetti on the hob like you would normally, but this time add food colouring into the water. Lay it out in a dish for children to explore and play with. You can provide dishes and containers to transfer and fill. I did this with my toddler and it was a great opportunity to practise her cutting skills with scissors. We hung the spaghetti over the mug tree to make it easier!

5. Edible yoghurt painting
What you need:
Natural/Greek yoghurt
Food Colouring
Different painting utensils; clean brushes, pastry brush, whisks, potato masher, spoons for blobbing, forks for scraping anything else you can think of!
Mix the yoghurt together with the food colouring, use different pots for different colours. Put your child on a wipeable surface and let them go.

6. Rainbow oats
Oats 1 cup
Food colouring
Water 1/4 cup
Sandwich bags
Container
Scoops and bowls
Mix the water and food colouring together and add to the oats in a sandwich bag. Shake the oats until they are fully covered in the colour. Leave out to dry for a few hours and when ready to play, crumble the oats a little bit so that they loosen up. This one is great for all ages. Babies will use their hands and mouths to explore, whereas toddlers will be able to scoop, fill and pour using the oats and utensils.
7. Spaghetti painting
Spaghetti
Saucepan
Boiling water
Washable paints/Use the edible paint recipe above
Cook spaghetti as you normally would and add them to a container for your child to explore. Here we used normal washable paints to paint the spaghetti but if you wanted to make this completely edible you can use the edible paint recipe (see no 1 Edible yoghurt painting).

8. Fruit soup
Water
Bowl
Fruit cut up
Ladle
Different sized spoons
Super simple one! Just cut up any fruit/veg as you’d like it and add it to water! If this is for a baby I would use a tray with a splash of water and allow them to explore using their whole body. For a toddler I would use a container with a few different sized spoons so they can stir, mix, pour and role play.

9, Rainbow
toast painting.
Toast
Milk with food colouring
Clean paintbrushes
This idea was stolen from my friend Molly @create_make_and_play, its on my wish list to do at breakfast time. I couldn’t not include it on here because I just think its so fab!
Mix milk with food colouring, using the paintbrushes to paint the toast! Voila! Rainbow toast!
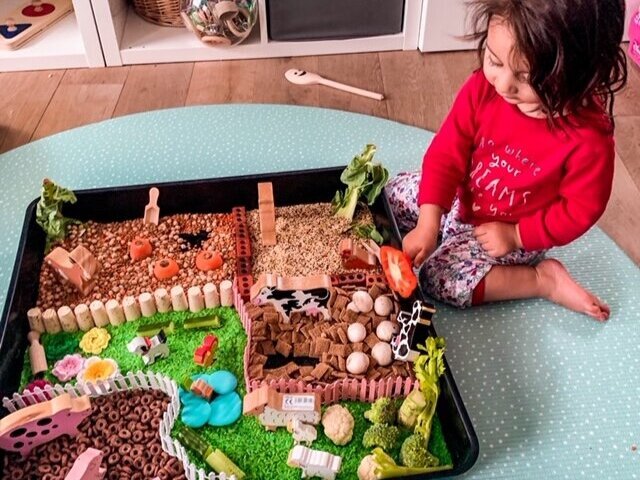
10.Edible farm.
Cereal
Rice
Lentils/couscous/pasta/chickpeas
Vegetables: cucumber, broccoli, cauliflower, cabbage leaves, carrots, mushrooms and celery
Farm animals
Objects to create different areas e.g. corks, fences, bricks etc although not essential
Here I have set up a farm using all the different ingredients above. But you can basically set up this little small world activity however you like. It doesn’t even need to be a farm if you don’t want it to be! It can be a sea world using blue jelly or a dirt road using chocolate pudding! As long as you include edible/dried food items into your role play set up- you are allowing your children to explore and play with food in an environment where there is no pressure to eat it!

11. Edible play dough.
½ cup of fine baby cereal
½ cup of corn flour
¼ cup of baby puree (a light coloured one is best)
1 tbsp oil
2 tbsp of boiling water
Food colouring
Mix all the dry ingredients together, mix the wet ingredients together with the food colouring. Combine the two and knead until smooth. This can be stored in the fridge, each ball wrapped separately in cling film. Although this playdough is edible, children of course should still be supervised, in case they shovel it in!
This is a great one for sibling play. You can provide your children with cutters, utensils for making marks, rolling pins etc just like you would with normal playdough!

12. Pasta posting
Pasta
Paint (optional)
Cardboard box
Scissors
Colouring pens/pencils
First of all, you can do this activity in a variety of ways. Here I just kept it a simple posting activity for fine motor. However, you can turn it into a colour matching and recognition activity by colouring the holes and colouring the pasta, a number recognition activity by writing the digits above the holes and posting that amount of pasta shapes through, a letter recognition by writing the letters/sounds on the holes and then onto the corresponding pasta shape (tubes or shells would be great for this).
If you want to dye the pasta the most effective way is to use ready mixed paint. Just squirt in a bag with desired amount of pasta and lay out flat to dry. It dries in a matter of minutes and can be used and reused so many times!

13. Vegetable printing.
Expired vegetables; mushrooms, broccoli, cauliflower, carrots, potatoes
Shape cutters
Paint
Paper
Another super easy one and one that takes me back to when I was a child, vegetable painting! For the potatoes I chop them in half and use sandwich cutters to make an indent. Then I carefully cut with a knife around the shape to that the shape of the cutter is left poking out of the potato (see photo). With the rest of the vegetables I literally use them as you get them! Dip them in the paint and use to make lovely patterns and shapes!

14. Sensory bins.
Chickpeas
Lentils
Popcorn kernels
Rice
Couscous
Pasta
Quinoa
This is a bit of a cheat because it covers lots of different activities but I really feel like it’s an important one to mention because dried foods in general are an amazing base for any sensory bin!
You can leave them natural or dye them with paint (in a sandwich bag with paint, shake and leave on a dish out to dry. Dries within minutes!). Use them to hide different things inside. Puzzle pieces, shapes, letters, numbers, small world toys, words, sounds, natural objects, everything and anything. They make an amazing base for a small world set up such as a road, a farm, an ocean, park, beach and so many more!
This blog was written by Lindsey Eivan. She is an early years foundation stage leader and mum to two toddlers. You can find Lindsey on Instagram @love_teach_play. Her page is full of fantastic play ideas for infants, toddlers and children.